Preface
A common part in a GUI application is a menubar. A menubar consists of objects called menus. Top-level menus have their labels on the menubar. The menus have menu items. Menu items are commands that perform a specific action inside the application. Menus can also have submenus, which have their own menu items. The following three classes are used to create menubars in wxPython: a wx.MenuBar, a wx.Menu and a wx.MenuItem.
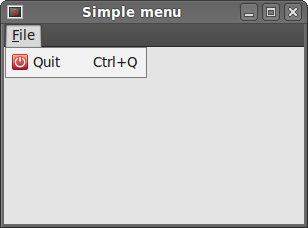
Simple menu
In our first example, we will create a menubar with one file menu. The menu will have only one menu item. By selecting the item the application quits.
- simple_menu.py
- #!/usr/bin/env python3
- # -*- coding: utf-8 -*-
- """
- ZetCode wxPython tutorial
- This example shows a simple menu.
- author: Jan Bodnar
- website: www.zetcode.com
- last modified: April 2018
- """
- import wx
- class Example(wx.Frame):
- def __init__(self, *args, **kwargs):
- super(Example, self).__init__(*args, **kwargs)
- self.InitUI()
- def InitUI(self):
- menubar = wx.MenuBar()
- fileMenu = wx.Menu()
- fileItem = fileMenu.Append(wx.ID_EXIT, 'Quit', 'Quit application')
- menubar.Append(fileMenu, '&File')
- self.SetMenuBar(menubar)
- self.Bind(wx.EVT_MENU, self.OnQuit, fileItem)
- self.SetSize((300, 200))
- self.SetTitle('Simple menu')
- self.Centre()
- def OnQuit(self, e):
- self.Close()
- def main():
- app = wx.App()
- ex = Example(None)
- ex.Show()
- app.MainLoop()
- if __name__ == '__main__':
- main()
- menubar = wx.MenuBar()
- fileMenu = wx.Menu()
- fileItem = fileMenu.Append(wx.ID_EXIT, 'Quit', 'Quit application')
- self.Bind(wx.EVT_MENU, self.OnQuit, fileItem)
- menubar.Append(fileMenu, '&File')
- self.SetMenuBar(menubar)
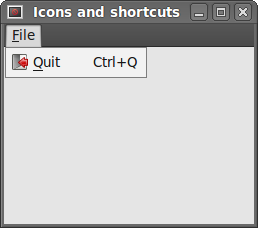
Icons and shortcuts
The next example is essentially the same as the previous one. This time, we manually create a wx.MenuItem
- icons_shortcuts.py
- #!/usr/bin/env python3
- # -*- coding: utf-8 -*-
- """
- ZetCode wxPython tutorial
- In this example, we manually create
- a menu item.
- author: Jan Bodnar
- website: www.zetcode.com
- last modified: April 2018
- """
- import wx
- APP_EXIT = 1
- class Example(wx.Frame):
- def __init__(self, *args, **kwargs):
- super(Example, self).__init__(*args, **kwargs)
- self.InitUI()
- def InitUI(self):
- menubar = wx.MenuBar()
- fileMenu = wx.Menu()
- qmi = wx.MenuItem(fileMenu, APP_EXIT, '&Quit\tCtrl+Q')
- qmi.SetBitmap(wx.Bitmap('exit.png'))
- fileMenu.Append(qmi)
- self.Bind(wx.EVT_MENU, self.OnQuit, id=APP_EXIT)
- menubar.Append(fileMenu, '&File')
- self.SetMenuBar(menubar)
- self.SetSize((350, 250))
- self.SetTitle('Icons and shortcuts')
- self.Centre()
- def OnQuit(self, e):
- self.Close()
- def main():
- app = wx.App()
- ex = Example(None)
- ex.Show()
- app.MainLoop()
- if __name__ == '__main__':
- main()
- qmi = wx.MenuItem(fileMenu, APP_EXIT, '&Quit\tCtrl+Q')
- qmi.SetBitmap(wx.Bitmap('exit.png'))
- fileMenu.Append(qmi)
- self.Bind(wx.EVT_MENU, self.OnQuit, id=APP_EXIT)
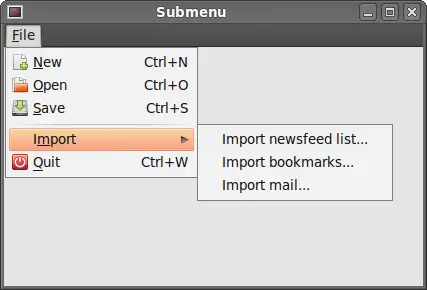
Submenus and separators
Each menu can also have a submenu. This way we can place similar commands into groups. For example we can place commands that hide/show various toolbars like personal bar, address bar, status bar or navigation bar into a submenu called toolbars. Within a menu, we can seperate commands with a separator. It is a simple line. It is common practice to separate commands like New, Open, Save from commands like Print, Print preview with a single separator. In our example we will see, how we can create submenus and menu separators.
- submenu.py
- #!/usr/bin/env python3
- # -*- coding: utf-8 -*-
- """
- ZetCode wxPython tutorial
- In this example, we create a submenu and a menu
- separator.
- author: Jan Bodnar
- website: www.zetcode.com
- last modified: April 2018
- """
- import wx
- class Example(wx.Frame):
- def __init__(self, *args, **kwargs):
- super(Example, self).__init__(*args, **kwargs)
- self.InitUI()
- def InitUI(self):
- menubar = wx.MenuBar()
- fileMenu = wx.Menu()
- fileMenu.Append(wx.ID_NEW, '&New')
- fileMenu.Append(wx.ID_OPEN, '&Open')
- fileMenu.Append(wx.ID_SAVE, '&Save')
- fileMenu.AppendSeparator()
- imp = wx.Menu()
- imp.Append(wx.ID_ANY, 'Import newsfeed list...')
- imp.Append(wx.ID_ANY, 'Import bookmarks...')
- imp.Append(wx.ID_ANY, 'Import mail...')
- fileMenu.AppendMenu(wx.ID_ANY, 'I&mport', imp)
- qmi = wx.MenuItem(fileMenu, wx.ID_EXIT, '&Quit\tCtrl+W')
- fileMenu.AppendItem(qmi)
- self.Bind(wx.EVT_MENU, self.OnQuit, qmi)
- menubar.Append(fileMenu, '&File')
- self.SetMenuBar(menubar)
- self.SetSize((350, 250))
- self.SetTitle('Submenu')
- self.Centre()
- def OnQuit(self, e):
- self.Close()
- def main():
- app = wx.App()
- ex = Example(None)
- ex.Show()
- app.MainLoop()
- if __name__ == '__main__':
- main()
- fileMenu.Append(wx.ID_NEW, '&New')
- fileMenu.Append(wx.ID_OPEN, '&Open')
- fileMenu.Append(wx.ID_SAVE, '&Save')
- fileMenu.AppendSeparator()
- imp = wx.Menu()
- imp.Append(wx.ID_ANY, 'Import newsfeed list...')
- imp.Append(wx.ID_ANY, 'Import bookmarks...')
- imp.Append(wx.ID_ANY, 'Import mail...')
- fileMenu.AppendMenu(wx.ID_ANY, 'I&mport', imp)
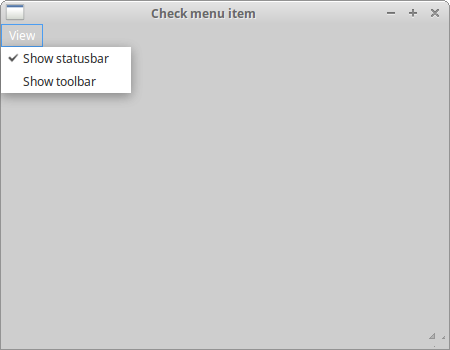
Check menu item
There are tree kinds of menu items:
In the following example, we will demonstrate the check menu item. A check menu item is visually represented by a tick in the menu:
- checkmenu_item.py
- #!/usr/bin/env python3
- # -*- coding: utf-8 -*-
- """
- ZetCode wxPython tutorial
- This example creates a checked
- menu item.
- author: Jan Bodnar
- website: www.zetcode.com
- last modified: April 2018
- """
- import wx
- class Example(wx.Frame):
- def __init__(self, *args, **kwargs):
- super(Example, self).__init__(*args, **kwargs)
- self.InitUI()
- def InitUI(self):
- menubar = wx.MenuBar()
- viewMenu = wx.Menu()
- self.shst = viewMenu.Append(wx.ID_ANY, 'Show statusbar',
- 'Show Statusbar', kind=wx.ITEM_CHECK)
- self.shtl = viewMenu.Append(wx.ID_ANY, 'Show toolbar',
- 'Show Toolbar', kind=wx.ITEM_CHECK)
- viewMenu.Check(self.shst.GetId(), True)
- viewMenu.Check(self.shtl.GetId(), True)
- self.Bind(wx.EVT_MENU, self.ToggleStatusBar, self.shst)
- self.Bind(wx.EVT_MENU, self.ToggleToolBar, self.shtl)
- menubar.Append(viewMenu, '&View')
- self.SetMenuBar(menubar)
- self.toolbar = self.CreateToolBar()
- self.toolbar.AddTool(1, '', wx.Bitmap('texit.png'))
- self.toolbar.Realize()
- self.statusbar = self.CreateStatusBar()
- self.statusbar.SetStatusText('Ready')
- self.SetSize((450, 350))
- self.SetTitle('Check menu item')
- self.Centre()
- def ToggleStatusBar(self, e):
- if self.shst.IsChecked():
- self.statusbar.Show()
- else:
- self.statusbar.Hide()
- def ToggleToolBar(self, e):
- if self.shtl.IsChecked():
- self.toolbar.Show()
- else:
- self.toolbar.Hide()
- def main():
- app = wx.App()
- ex = Example(None)
- ex.Show()
- app.MainLoop()
- if __name__ == '__main__':
- main()
When the application starts, both statusbar and toolbar are visible. So we check both menu items with the Check() method. We show or hide the statusbar according to the state of the check menu item. We find out the state of the check menu item with the IsChecked() method. Same with toolbar:
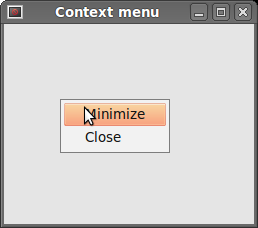
Context menu
A context menu is a list of commands that appears under some context. For example, in a Firefox web browser, when we right click on a web page, we get a context menu. Here we can reload a page, go back or view page source. If we right click on a toolbar, we get another context menu for managing toolbars. Context menus are sometimes called popup menus.
- context_menu.py
- #!/usr/bin/env python3
- # -*- coding: utf-8 -*-
- """
- ZetCode wxPython tutorial
- In this example, we create a context menu.
- author: Jan Bodnar
- website: www.zetcode.com
- last modified: April 2018
- """
- import wx
- class MyPopupMenu(wx.Menu):
- def __init__(self, parent):
- super(MyPopupMenu, self).__init__()
- self.parent = parent
- mmi = wx.MenuItem(self, wx.NewId(), 'Minimize')
- self.Append(mmi)
- self.Bind(wx.EVT_MENU, self.OnMinimize, mmi)
- cmi = wx.MenuItem(self, wx.NewId(), 'Close')
- self.Append(cmi)
- self.Bind(wx.EVT_MENU, self.OnClose, cmi)
- def OnMinimize(self, e):
- self.parent.Iconize()
- def OnClose(self, e):
- self.parent.Close()
- class Example(wx.Frame):
- def __init__(self, *args, **kwargs):
- super(Example, self).__init__(*args, **kwargs)
- self.InitUI()
- def InitUI(self):
- self.Bind(wx.EVT_RIGHT_DOWN, self.OnRightDown)
- self.SetSize((350, 250))
- self.SetTitle('Context menu')
- self.Centre()
- def OnRightDown(self, e):
- self.PopupMenu(MyPopupMenu(self), e.GetPosition())
- def main():
- app = wx.App()
- ex = Example(None)
- ex.Show()
- app.MainLoop()
- if __name__ == '__main__':
- main()
- self.Bind(wx.EVT_RIGHT_DOWN, self.OnRightDown)
Toolbars
Menus group all commands that we can use in an application. Toolbars provide a quick access to the most frequently used commands. To create a toolbar, we call the CreateToolBar() method of the frame widget.
- toolbar.py
- #!/usr/bin/env python3
- # -*- coding: utf-8 -*-
- """
- ZetCode wxPython tutorial
- This example creates a simple toolbar.
- author: Jan Bodnar
- website: www.zetcode.com
- last modified: April 2018
- """
- import wx
- class Example(wx.Frame):
- def __init__(self, *args, **kwargs):
- super(Example, self).__init__(*args, **kwargs)
- self.InitUI()
- def InitUI(self):
- toolbar = self.CreateToolBar()
- qtool = toolbar.AddTool(wx.ID_ANY, 'Quit', wx.Bitmap('texit.png'))
- toolbar.Realize()
- self.Bind(wx.EVT_TOOL, self.OnQuit, qtool)
- self.SetSize((350, 250))
- self.SetTitle('Simple toolbar')
- self.Centre()
- def OnQuit(self, e):
- self.Close()
- def main():
- app = wx.App()
- ex = Example(None)
- ex.Show()
- app.MainLoop()
- if __name__ == '__main__':
- main()
- qtool = toolbar.AddTool(wx.ID_ANY, 'Quit', wx.Bitmap('texit.png'))
- self.Bind(wx.EVT_TOOL, self.OnQuit, qtool)

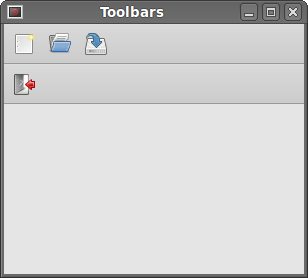
If we want to create more than one toolbar, we must do it differently.
- toolbars.py
- #!/usr/bin/env python3
- # -*- coding: utf-8 -*-
- '''
- ZetCode wxPython tutorial
- In this example, we create two horizontal
- toolbars.
- author: Jan Bodnar
- website: www.zetcode.com
- last modified: April 2018
- '''
- import wx
- class Example(wx.Frame):
- def __init__(self, *args, **kwargs):
- super(Example, self).__init__(*args, **kwargs)
- self.InitUI()
- def InitUI(self):
- vbox = wx.BoxSizer(wx.VERTICAL)
- toolbar1 = wx.ToolBar(self)
- toolbar1.AddTool(wx.ID_ANY, '', wx.Bitmap('tnew.png'))
- toolbar1.AddTool(wx.ID_ANY, '', wx.Bitmap('topen.png'))
- toolbar1.AddTool(wx.ID_ANY, '', wx.Bitmap('tsave.png'))
- toolbar1.Realize()
- toolbar2 = wx.ToolBar(self)
- qtool = toolbar2.AddTool(wx.ID_EXIT, '', wx.Bitmap('texit.png'))
- toolbar2.Realize()
- vbox.Add(toolbar1, 0, wx.EXPAND)
- vbox.Add(toolbar2, 0, wx.EXPAND)
- self.Bind(wx.EVT_TOOL, self.OnQuit, qtool)
- self.SetSizer(vbox)
- self.SetSize((350, 250))
- self.SetTitle('Toolbars')
- self.Centre()
- def OnQuit(self, e):
- self.Close()
- def main():
- app = wx.App()
- ex = Example(None)
- ex.Show()
- app.MainLoop()
- if __name__ == '__main__':
- main()
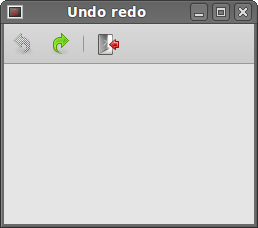
Enable & disable
In the following example we show how we can enable and disable toolbar buttons. We also add a separator line.
- undo_redo.py
- #!/usr/bin/env python3
- #!/usr/bin/env python3
- # -*- coding: utf-8 -*-
- """
- ZetCode wxPython tutorial
- In this example, we create two horizontal
- toolbars.
- author: Jan Bodnar
- website: www.zetcode.com
- last modified: April 2018
- """
- import wx
- class Example(wx.Frame):
- def __init__(self, *args, **kwargs):
- super(Example, self).__init__(*args, **kwargs)
- self.InitUI()
- def InitUI(self):
- self.count = 5
- self.toolbar = self.CreateToolBar()
- tundo = self.toolbar.AddTool(wx.ID_UNDO, '', wx.Bitmap('undo-26.png'))
- tredo = self.toolbar.AddTool(wx.ID_REDO, '', wx.Bitmap('redo-26.png'))
- self.toolbar.EnableTool(wx.ID_REDO, False)
- self.toolbar.AddSeparator()
- texit = self.toolbar.AddTool(wx.ID_EXIT, '', wx.Bitmap('exit-26.png'))
- self.toolbar.Realize()
- self.Bind(wx.EVT_TOOL, self.OnQuit, texit)
- self.Bind(wx.EVT_TOOL, self.OnUndo, tundo)
- self.Bind(wx.EVT_TOOL, self.OnRedo, tredo)
- self.SetSize((350, 250))
- self.SetTitle('Undo redo')
- self.Centre()
- def OnUndo(self, e):
- if self.count > 1 and self.count <= 5:
- self.count = self.count - 1
- if self.count == 1:
- self.toolbar.EnableTool(wx.ID_UNDO, False)
- if self.count == 4:
- self.toolbar.EnableTool(wx.ID_REDO, True)
- self.SetTitle("Count={:,d}".format(self.count))
- def OnRedo(self, e):
- if self.count < 5 and self.count >= 1:
- self.count = self.count + 1
- if self.count == 5:
- self.toolbar.EnableTool(wx.ID_REDO, False)
- if self.count == 2:
- self.toolbar.EnableTool(wx.ID_UNDO, True)
- self.SetTitle("Count={:,d}".format(self.count))
- def OnQuit(self, e):
- self.Close()
- def main():
- app = wx.App()
- ex = Example(None)
- ex.Show()
- app.MainLoop()
- if __name__ == '__main__':
- main()
In the beginning, the redo button is disabled. We do it by calling the EnableTool() method. We can create some logical groups within a toolbar. We can separate various groups of buttons by a small vertical line. To do this, we call the AddSeparator() method.
Supplement
* Next - Layout management in wxPython


沒有留言:
張貼留言