Layout management in wxPython
A typical application consists of various widgets. Those widgets are placed inside container widgets. A programmer must manage the layout of the application. This is not an easy task. In wxPython it is possible to lay out widgets using absolute positioning or using sizers.
Absolute Positioning
The programmer specifies the position and the size of each widget in pixels. Absolute positioning has several disadvantages:
There might be situations where we can possibly use absolute positioning. For instance, small test examples. But mostly, in real world programs, programmers use sizers.
In our example we have a simple skeleton of a text editor. If we resize the window, the size of out wx.TextCtrl does not change as we would expect:
- absolute.py
- #!/usr/bin/env python3
- # -*- coding: utf-8 -*-
- """
- ZetCode wxPython tutorial
- In this example, we lay out widgets using
- absolute positioning.
- author: Jan Bodnar
- website: www.zetcode.com
- last modified: April 2018
- """
- import wx
- class Example(wx.Frame):
- def __init__(self, parent, title):
- super(Example, self).__init__(parent, title=title,
- size=(500, 400))
- self.InitUI()
- self.Centre()
- def InitUI(self):
- self.panel = wx.Panel(self)
- self.panel.SetBackgroundColour("gray")
- self.LoadImages()
- self.mincol.SetPosition((20, 20))
- self.bardejov.SetPosition((20, 160))
- self.rotunda.SetPosition((250, 20))
- def LoadImages(self):
- self.mincol = wx.StaticBitmap(self.panel, wx.ID_ANY,
- wx.Bitmap("mincol.jpg", wx.BITMAP_TYPE_ANY))
- self.bardejov = wx.StaticBitmap(self.panel, wx.ID_ANY,
- wx.Bitmap("bardejov.jpg", wx.BITMAP_TYPE_ANY))
- self.rotunda = wx.StaticBitmap(self.panel, wx.ID_ANY,
- wx.Bitmap("rotunda.jpg", wx.BITMAP_TYPE_ANY))
- def main():
- app = wx.App()
- ex = Example(None, title='Absolute positioning')
- ex.Show()
- app.MainLoop()
- if __name__ == '__main__':
- main()
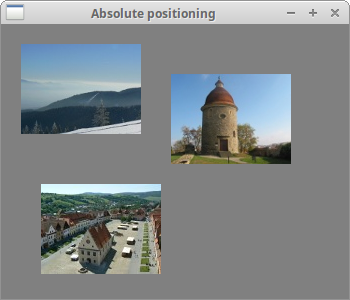
In the above example, we position three images using absolute coordinates. With the SetPosition() method we place the image at exact position in coordinates we want.
Using sizers
Sizers do address all those issues we mentioned by absolute positioning. wxPython has the following sizers:
* wx.BoxSizer
wx.BoxSizer
wx.BoxSizer enables us to put several widgets into a row or a column. We can put another sizer into an existing sizer. This way we can create very complex layouts:
- box = wx.BoxSizer(integer orient)
- box.Add(wx.Window window, integer proportion=0, integer flag = 0, integer border = 0)
With the flag parameter you can further configure the behaviour of the widgets within a wx.BoxSizer. We can control the border between the widgets. We add some space between widgets in pixels. In order to apply border we need to define sides, where the border will be used. We can combine them with the | operator; for instance wx.LEFT | wx.BOTTOM. We can choose between these flags:
The sizer is set to the panel widget with SetSizer() method.
- border.py
- #!/usr/bin/env python3
- # -*- coding: utf-8 -*-
- """
- ZetCode wxPython tutorial
- In this example we place a panel inside
- another panel.
- author: Jan Bodnar
- website: www.zetcode.com
- last modified: April 2018
- """
- import wx
- class Example(wx.Frame):
- def __init__(self, parent, title):
- super(Example, self).__init__(parent, title=title)
- self.InitUI()
- self.Centre()
- def InitUI(self):
- panel = wx.Panel(self)
- panel.SetBackgroundColour('#4f5049')
- vbox = wx.BoxSizer(wx.VERTICAL)
- midPan = wx.Panel(panel)
- midPan.SetBackgroundColour('#ededed')
- vbox.Add(midPan, wx.ID_ANY, wx.EXPAND | wx.ALL, 20)
- panel.SetSizer(vbox)
- def main():
- app = wx.App()
- ex = Example(None, title='Border')
- ex.Show()
- app.MainLoop()
- if __name__ == '__main__':
- main()
- vbox.Add(midPan, wx.ID_ANY, wx.EXPAND | wx.ALL, 20)
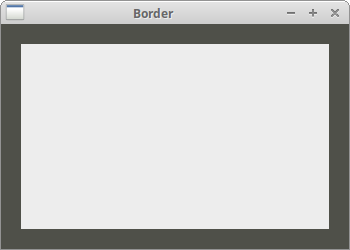
If we use wx.EXPAND flag, our widget will use all the space that has been allotted to it. Lastly, we can also define the alignment of our widgets. We do it with the following flags:
GoToClass example
In the following example we introduce several important ideas.
- goto_class.py
- #!/usr/bin/env python3
- # -*- coding: utf-8 -*-
- """
- ZetCode wxPython tutorial
- In this example we create a Go To class
- layout with wx.BoxSizer.
- author: Jan Bodnar
- website: www.zetcode.com
- last modified: April 2018
- """
- import wx
- class Example(wx.Frame):
- def __init__(self, parent, title):
- super(Example, self).__init__(parent, title=title)
- self.InitUI()
- self.Centre()
- def InitUI(self):
- panel = wx.Panel(self)
- font = wx.SystemSettings.GetFont(wx.SYS_SYSTEM_FONT)
- font.SetPointSize(9)
- vbox = wx.BoxSizer(wx.VERTICAL)
- hbox1 = wx.BoxSizer(wx.HORIZONTAL)
- st1 = wx.StaticText(panel, label='Class Name')
- st1.SetFont(font)
- hbox1.Add(st1, flag=wx.RIGHT, border=8)
- tc = wx.TextCtrl(panel)
- hbox1.Add(tc, proportion=1)
- vbox.Add(hbox1, flag=wx.EXPAND|wx.LEFT|wx.RIGHT|wx.TOP, border=10)
- vbox.Add((-1, 10))
- hbox2 = wx.BoxSizer(wx.HORIZONTAL)
- st2 = wx.StaticText(panel, label='Matching Classes')
- st2.SetFont(font)
- hbox2.Add(st2)
- vbox.Add(hbox2, flag=wx.LEFT | wx.TOP, border=10)
- vbox.Add((-1, 10))
- hbox3 = wx.BoxSizer(wx.HORIZONTAL)
- tc2 = wx.TextCtrl(panel, style=wx.TE_MULTILINE)
- hbox3.Add(tc2, proportion=1, flag=wx.EXPAND)
- vbox.Add(hbox3, proportion=1, flag=wx.LEFT|wx.RIGHT|wx.EXPAND,
- border=10)
- vbox.Add((-1, 25))
- hbox4 = wx.BoxSizer(wx.HORIZONTAL)
- cb1 = wx.CheckBox(panel, label='Case Sensitive')
- cb1.SetFont(font)
- hbox4.Add(cb1)
- cb2 = wx.CheckBox(panel, label='Nested Classes')
- cb2.SetFont(font)
- hbox4.Add(cb2, flag=wx.LEFT, border=10)
- cb3 = wx.CheckBox(panel, label='Non-Project classes')
- cb3.SetFont(font)
- hbox4.Add(cb3, flag=wx.LEFT, border=10)
- vbox.Add(hbox4, flag=wx.LEFT, border=10)
- vbox.Add((-1, 25))
- hbox5 = wx.BoxSizer(wx.HORIZONTAL)
- btn1 = wx.Button(panel, label='Ok', size=(70, 30))
- hbox5.Add(btn1)
- btn2 = wx.Button(panel, label='Close', size=(70, 30))
- hbox5.Add(btn2, flag=wx.LEFT|wx.BOTTOM, border=5)
- vbox.Add(hbox5, flag=wx.ALIGN_RIGHT|wx.RIGHT, border=10)
- panel.SetSizer(vbox)
- def main():
- app = wx.App()
- ex = Example(None, title='Go To Class')
- ex.Show()
- app.MainLoop()
- if __name__ == '__main__':
- main()
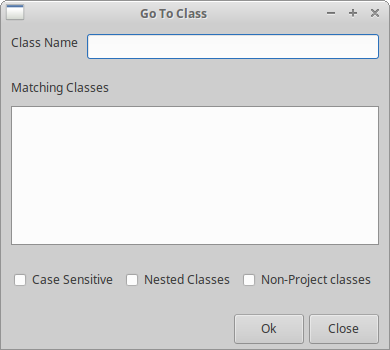
Figure: A GoToClass window
wx.GridSizer
The wx.GridSizer lays out widgets in two dimensional table. Each cell within the table has the same size:
- wx.GridSizer(int rows=1, int cols=0, int vgap=0, int hgap=0)
- calculator.py
- #!/usr/bin/env python3
- # -*- coding: utf-8 -*-
- """
- ZetCode wxPython tutorial
- In this example we create a layout
- of a calculator with wx.GridSizer.
- author: Jan Bodnar
- website: www.zetcode.com
- last modified: April 2018
- """
- import wx
- class Example(wx.Frame):
- def __init__(self, parent, title):
- super(Example, self).__init__(parent, title=title)
- self.InitUI()
- self.Centre()
- def InitUI(self):
- menubar = wx.MenuBar()
- fileMenu = wx.Menu()
- menubar.Append(fileMenu, '&File')
- self.SetMenuBar(menubar)
- vbox = wx.BoxSizer(wx.VERTICAL)
- self.display = wx.TextCtrl(self, style=wx.TE_RIGHT)
- vbox.Add(self.display, flag=wx.EXPAND|wx.TOP|wx.BOTTOM, border=4)
- gs = wx.GridSizer(5, 4, 5, 5)
- gs.AddMany( [(wx.Button(self, label='Cls'), 0, wx.EXPAND),
- (wx.Button(self, label='Bck'), 0, wx.EXPAND),
- (wx.StaticText(self), wx.EXPAND),
- (wx.Button(self, label='Close'), 0, wx.EXPAND),
- (wx.Button(self, label='7'), 0, wx.EXPAND),
- (wx.Button(self, label='8'), 0, wx.EXPAND),
- (wx.Button(self, label='9'), 0, wx.EXPAND),
- (wx.Button(self, label='/'), 0, wx.EXPAND),
- (wx.Button(self, label='4'), 0, wx.EXPAND),
- (wx.Button(self, label='5'), 0, wx.EXPAND),
- (wx.Button(self, label='6'), 0, wx.EXPAND),
- (wx.Button(self, label='*'), 0, wx.EXPAND),
- (wx.Button(self, label='1'), 0, wx.EXPAND),
- (wx.Button(self, label='2'), 0, wx.EXPAND),
- (wx.Button(self, label='3'), 0, wx.EXPAND),
- (wx.Button(self, label='-'), 0, wx.EXPAND),
- (wx.Button(self, label='0'), 0, wx.EXPAND),
- (wx.Button(self, label='.'), 0, wx.EXPAND),
- (wx.Button(self, label='='), 0, wx.EXPAND),
- (wx.Button(self, label='+'), 0, wx.EXPAND) ])
- vbox.Add(gs, proportion=1, flag=wx.EXPAND)
- self.SetSizer(vbox)
- def main():
- app = wx.App()
- ex = Example(None, title='Calculator')
- ex.Show()
- app.MainLoop()
- if __name__ == '__main__':
- main()
Widgets are placed inside the table in the order, they are added. The first row is filled first, then the second row etc:
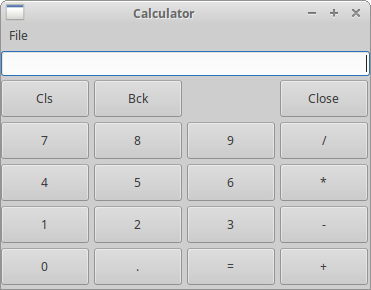
Figure: Calculator
wx.FlexGridSizer
This sizer is similar to wx.GridSizer. It does also lay out its widgets in a two dimensional table. It adds some flexibility to it. wx.GridSizer cells are of the same size. All cells in wx.FlexGridSizer have the same height in a row. All cells have the same width in a column. But all rows and columns are not necessarily the same height or width:
- wx.FlexGridSizer(int rows=1, int cols=0, int vgap=0, int hgap=0)
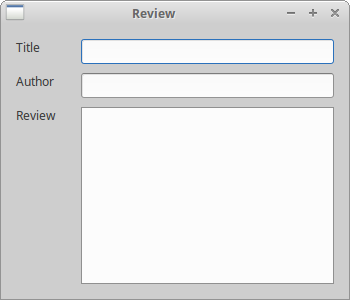
Many times developers have to develop dialogs for data input and modification. I find wx.FlexGridSizer suitable for such a task. A developer can easily set up a dialog window with this sizer. It is also possible to accomplish this with wx.GridSizer, but it would not look nice, because of the constraint that each cell must have the same size.
- review.py
- #!/usr/bin/env python3
- # -*- coding: utf-8 -*-
- """
- ZetCode wxPython tutorial
- In this example we create review
- layout with wx.FlexGridSizer.
- author: Jan Bodnar
- website: www.zetcode.com
- last modified: April 2018
- """
- import wx
- class Example(wx.Frame):
- def __init__(self, parent, title):
- super(Example, self).__init__(parent, title=title)
- self.InitUI()
- self.Centre()
- self.Show()
- def InitUI(self):
- panel = wx.Panel(self)
- hbox = wx.BoxSizer(wx.HORIZONTAL)
- fgs = wx.FlexGridSizer(3, 2, 9, 25)
- title = wx.StaticText(panel, label="Title")
- author = wx.StaticText(panel, label="Author")
- review = wx.StaticText(panel, label="Review")
- tc1 = wx.TextCtrl(panel)
- tc2 = wx.TextCtrl(panel)
- tc3 = wx.TextCtrl(panel, style=wx.TE_MULTILINE)
- fgs.AddMany([(title), (tc1, 1, wx.EXPAND), (author),
- (tc2, 1, wx.EXPAND), (review, 1, wx.EXPAND), (tc3, 1, wx.EXPAND)])
- fgs.AddGrowableRow(2, 1) # Only cell(2, *) can grow in row direction
- fgs.AddGrowableCol(1, 1) # Only cell(*, 1) can grow in column direction
- hbox.Add(fgs, proportion=1, flag=wx.ALL|wx.EXPAND, border=15)
- panel.SetSizer(hbox)
- def main():
- app = wx.App()
- ex = Example(None, title='Review')
- ex.Show()
- app.MainLoop()
- if __name__ == '__main__':
- main()
- fgs.AddGrowableRow(2, 1)
- fgs.AddGrowableCol(1, 1)
wx.GridBagSizer
wx.GridBagSizer is the most flexible sizer in wxPython. to use. This kind of sizer is not typical only for wxPython. We can find it in other toolkits as well. This sizer enables explicit positioning of items. Items can also optionally span more than one row or column. The wx.GridBagSizer has a simple constructor.
- wx.GridBagSizer(integer vgap, integer hgap)
- Add(self, item, tuple pos, tuple span=wx.DefaultSpan, integer flag=0,
- integer border=0, userData=None)
Rename window example
In our first example, we create a Rename window. It will have one wx.StaticText, one wx.TextCtrl and two wx.Button widgets.
- rename.py
- #!/usr/bin/env python3
- # -*- coding: utf-8 -*-
- """
- ZetCode wxPython tutorial
- In this example we create a rename layout
- with wx.GridBagSizer.
- author: Jan Bodnar
- website: www.zetcode.com
- last modified: April 2018
- """
- import wx
- class Example(wx.Frame):
- def __init__(self, parent, title):
- super(Example, self).__init__(parent, title=title)
- self.InitUI()
- self.Centre()
- def InitUI(self):
- panel = wx.Panel(self)
- sizer = wx.GridBagSizer(4, 4)
- text = wx.StaticText(panel, label="Rename To")
- sizer.Add(text, pos=(0, 0), flag=wx.TOP|wx.LEFT|wx.BOTTOM, border=5)
- tc = wx.TextCtrl(panel)
- sizer.Add(tc, pos=(1, 0), span=(1, 5),
- flag=wx.EXPAND|wx.LEFT|wx.RIGHT, border=5)
- buttonOk = wx.Button(panel, label="Ok", size=(90, 28))
- buttonClose = wx.Button(panel, label="Close", size=(90, 28))
- sizer.Add(buttonOk, pos=(3, 3))
- sizer.Add(buttonClose, pos=(3, 4), flag=wx.RIGHT|wx.BOTTOM, border=10)
- sizer.AddGrowableCol(1)
- sizer.AddGrowableRow(2)
- panel.SetSizer(sizer)
- def main():
- app = wx.App()
- ex = Example(None, title='Rename')
- ex.Show()
- app.MainLoop()
- if __name__ == '__main__':
- main()
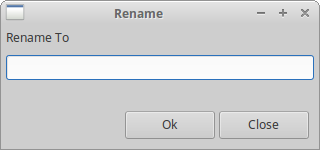
Figure: Rename window
We must look at the window as a one big grid table. Firstly, the text "Rename to" goes to the left upper corner. So we specify the (0, 0) position. And we add some space to the bottom, left, and bottom.
- text = wx.StaticText(panel, label="Rename To")
- sizer.Add(text, pos=(0, 0), flag=wx.TOP|wx.LEFT|wx.BOTTOM, border=10)
- tc = wx.TextCtrl(panel)
- sizer.Add(tc, pos=(1, 0), span=(1, 5),
- flag=wx.EXPAND|wx.LEFT|wx.RIGHT, border=5)
- sizer.Add(buttonOk, pos=(3, 3))
- sizer.Add(buttonClose, pos=(3, 4), flag=wx.RIGHT|wx.BOTTOM, border=10)
- sizer.AddGrowableCol(1)
- sizer.AddGrowableRow(2)
In the next example is we create a window, which can be found in JDeveloper. It is a window for creating a new class in Java.
- new_class.py
- #!/usr/bin/env python3
- # -*- coding: utf-8 -*-
- """
- ZetCode wxPython tutorial
- In this example we create a new class layout
- with wx.GridBagSizer.
- author: Jan Bodnar
- website: www.zetcode.com
- last modified: April 2018
- """
- import wx
- class Example(wx.Frame):
- def __init__(self, parent, title):
- super(Example, self).__init__(parent, title=title)
- self.InitUI()
- self.Centre()
- def InitUI(self):
- panel = wx.Panel(self)
- sizer = wx.GridBagSizer(5, 5)
- text1 = wx.StaticText(panel, label="Java Class")
- sizer.Add(text1, pos=(0, 0), flag=wx.TOP|wx.LEFT|wx.BOTTOM,
- border=15)
- icon = wx.StaticBitmap(panel, bitmap=wx.Bitmap('exec.png'))
- sizer.Add(icon, pos=(0, 4), flag=wx.TOP|wx.RIGHT|wx.ALIGN_RIGHT,
- border=5)
- line = wx.StaticLine(panel)
- sizer.Add(line, pos=(1, 0), span=(1, 5),
- flag=wx.EXPAND|wx.BOTTOM, border=10)
- text2 = wx.StaticText(panel, label="Name")
- sizer.Add(text2, pos=(2, 0), flag=wx.LEFT, border=10)
- tc1 = wx.TextCtrl(panel)
- sizer.Add(tc1, pos=(2, 1), span=(1, 3), flag=wx.TOP|wx.EXPAND)
- text3 = wx.StaticText(panel, label="Package")
- sizer.Add(text3, pos=(3, 0), flag=wx.LEFT|wx.TOP, border=10)
- tc2 = wx.TextCtrl(panel)
- sizer.Add(tc2, pos=(3, 1), span=(1, 3), flag=wx.TOP|wx.EXPAND,
- border=5)
- button1 = wx.Button(panel, label="Browse...")
- sizer.Add(button1, pos=(3, 4), flag=wx.TOP|wx.RIGHT, border=5)
- text4 = wx.StaticText(panel, label="Extends")
- sizer.Add(text4, pos=(4, 0), flag=wx.TOP|wx.LEFT, border=10)
- combo = wx.ComboBox(panel)
- sizer.Add(combo, pos=(4, 1), span=(1, 3),
- flag=wx.TOP|wx.EXPAND, border=5)
- button2 = wx.Button(panel, label="Browse...")
- sizer.Add(button2, pos=(4, 4), flag=wx.TOP|wx.RIGHT, border=5)
- sb = wx.StaticBox(panel, label="Optional Attributes")
- boxsizer = wx.StaticBoxSizer(sb, wx.VERTICAL)
- boxsizer.Add(wx.CheckBox(panel, label="Public"),
- flag=wx.LEFT|wx.TOP, border=5)
- boxsizer.Add(wx.CheckBox(panel, label="Generate Default Constructor"),
- flag=wx.LEFT, border=5)
- boxsizer.Add(wx.CheckBox(panel, label="Generate Main Method"),
- flag=wx.LEFT|wx.BOTTOM, border=5)
- sizer.Add(boxsizer, pos=(5, 0), span=(1, 5),
- flag=wx.EXPAND|wx.TOP|wx.LEFT|wx.RIGHT , border=10)
- button3 = wx.Button(panel, label='Help')
- sizer.Add(button3, pos=(7, 0), flag=wx.LEFT, border=10)
- button4 = wx.Button(panel, label="Ok")
- sizer.Add(button4, pos=(7, 3))
- button5 = wx.Button(panel, label="Cancel")
- sizer.Add(button5, pos=(7, 4), span=(1, 1),
- flag=wx.BOTTOM|wx.RIGHT, border=10)
- sizer.AddGrowableCol(2)
- panel.SetSizer(sizer)
- sizer.Fit(self)
- def main():
- app = wx.App()
- ex = Example(None, title="Create Java Class")
- ex.Show()
- app.MainLoop()
- if __name__ == '__main__':
- main()
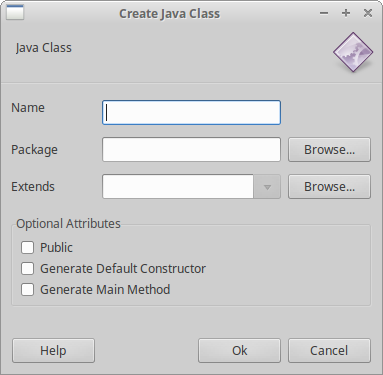

Figure: New class window
This part of the wxPython tutorial was dedicated to layout management.
Supplement
* Tutorialspoint - wxPython - GridBagSizer


沒有留言:
張貼留言