顯示具有 [Linux 小學堂] 標籤的文章。 顯示所有文章

2020年10月1日 星期四

[Linux 文章收集] How to Limit CPU Usage of a Process on Linux

 Source From Here

Preface
In your Linux lifetime, you must’ve seen some processes take up all the CPU cycles (90-99% CPU usage), making your computer nearly unresponsive till it finishes. That may be alright if the process takes a few seconds to complete. But what If it takes a long time? That’s not very nice to sit and look at your unresponsive computer for minutes and hours, right? Well, Linux has many awesome tools to make these not very nice processes to nice processes.

You can set how much CPU a single process is allowed to have. If the process really needs a lot of CPU power, you can run a few commands to give it all the idle CPU cycles (CPU cycles that you don’t need). That way, you will never have to sit and stare at your unresponsive computer for long.

In this article, I will show you how to Limit CPU usage of a process on Linux. I am going to use CentOS 7 in this article. But any modern Linux distribution should work. So, Let’s get started.

Limiting CPU Usage with nice and renice:
On Linux, the priorities of each running processes can be changed. You can set higher priorities to the process which is more important to you than a process that is hogging your CPU for no good reason.

Every process on Linux has a nice value. The value of nice determines which process has higher priorities and which has lower. Nice value can be between -20 to 19. A process with the nice value of -20 will have the highest priority and will use the most CPU cycles. A process with the nice value 19 will have the lowest priority and will use the CPU when no other processes are using it only.

There are two ways to set the nice value of a process. You can either start a process with the nice command to set a nice value while starting the process. Or you can use the renice command to set a nice value after a process has started. To set a nice value when you start a process, run the process as follows:
$ nice -n NICE_VALUE COMMAND_TO_RUN

NOTE: Here NICE_VALUE can be anything from -20 to 19 and COMMAND_TO_RUN is any command that you want to run with the nice value of NICE_VALUE.

For example, let’s say, you want to run the sleep command with the nice value of 14. Run the command as follows:
$ nice -n 14 sleep 40000 &

Now you can verify whether the nice value is set correctly using the top command. You can list all the processes that you started (as your login user) with the following command:
# ps -fl
F S UID PID PPID C PRI NI ADDR SZ WCHAN STIME TTY TIME CMD
0 S root 81144 81136 0 80 0 - 6706 - 21:22 pts/2 00:00:00 -bash
0 S root 81627 81144 0 94 14 - 1820 hrtime 22:00 pts/2 00:00:00 sleep 40000
0 R root 81628 81144 0 80 0 - 14455 - 22:00 pts/2 00:00:00 ps -fl

As you can see, the nice value of the process is set to 14.

Now if you wish to change the nice value of your existing processes, then all you need is the process ID (PID) of the process of which you want to change the nice value. You can use the ps aux command or the top command to find the process ID or PID.

Then you can run renice command as follows to change the nice value of an existing process:
$ sudo renice -n NEW_NICE_VALUE -p PROCESS_PID


Limiting CPU Usage with CGROUPS:
The full form of CGROUPS is Control Groups. It is a Linux kernel features used to limit resources to process groups such as (CPU, memory, permissions and many more) on Linux.

All you have to do is, create a new process group and add your processes that you want to limit resources to, to that group. Simple!

CGROUPS management tools are not installed on CentOS 7 by default. But it is available in the official package repository of CentOS 7. First update the YUM package repository cache with the following command:
# sudo yum makecache

Now install CGROUPS management tools with the following command:
# sudo yum install libcgroup-tools

You can limit CPU usage of a single group. For example, you can use CGROUPS to tell a process within a CGROUP to use let’s say 100ms out of every 1000ms (or .1s out of every 1s) of CPU time.

First create a CGROUP with the following command:
$ sudo cgcreate -g cpu:/cpulimit

NOTE: Here, cpulimit is the group name that controls the cpu usage.

Now, you have to set cpu.cfs_period_us and cpu.cfs_quota_us property on the cpulimit group.

For this example, 1000ms (milliseconds) or 1000000us (microseconds) should be set to cpu.cfs_period_us property and 100ms or 100000us should be set to the cpu.cfs_quota_us property. Run the following commands to set these properties to the cpulimit group:
$ sudo cgset -r cpu.cfs_period_us=1000000 cpulimit
$ sudo cgset -r cpu.cfs_quota_us=100000 cpulimit

Now you can run the following command to check whether all the properties are correctly set:
$ sudo cgget -g cpu:cpulimit

NOTE: Here, cpulimit is the name of the CGROUP and cpu is the resource that I am limiting.

As you can see, cpu.cfs_period_us and cpu.cfs_quota_us are correctly set:
  1. # cgget -g cpu:cpulimit  
  2. cpulimit:  
  3. cpu.cfs_period_us: 1000000  
  4. cpu.stat: nr_periods 2  
  5.         nr_throttled 0  
  6.         throttled_time 0  
  7. cpu.shares: 1024  
  8. cpu.cfs_quota_us: 100000  
  9. cpu.rt_runtime_us: 0  
  10. cpu.rt_period_us: 1000000  
Now whatever process you add to cpulimit CGROUP will use 1/10th (100000/1000000 = 1/10 = 0.1 = 10%) of the total CPU cycles.

Now to limit CPU of a process, start the program or command with cgexec as follows:
$ sudo cgexec -g cpu:cpulimit YOUR_COMMAND

NOTE: Here, YOUR_COMMAND can be any valid Linux commands.

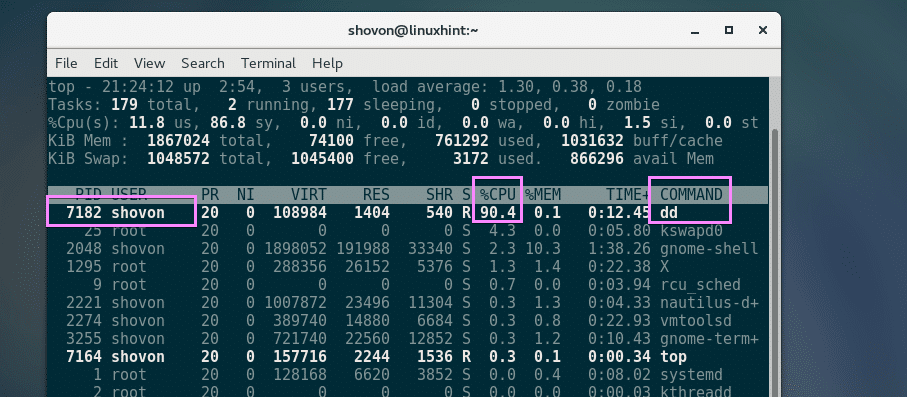
To prove that it actually works, first I am going to run the following command without CGROUPS and then with CGROUPS and show you the results:
$ dd if=/dev/zero of=out bs=1M

As you can see, without CGROUPS, the command uses 90% of the total CPU:


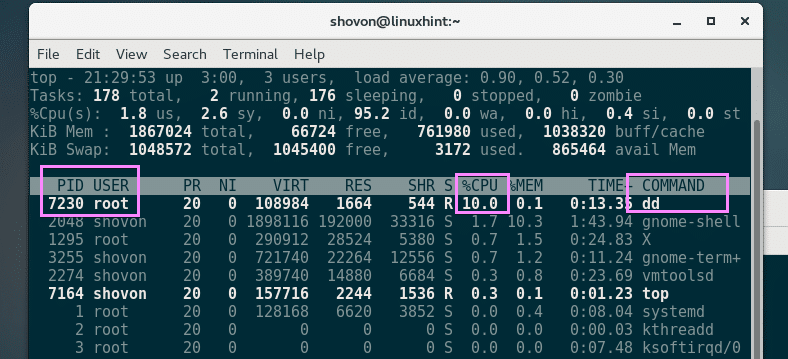
Then, I ran the same command with CGROUPS as follows:
$ sudo cgexec -g cpu:cpulimit dd if=/dev/zero of=out bs=1M

As you can see, the CPU usage is 10% at maximum. The process is not using more than that:


So that’s how you use CGROUPS to limit CPU usage of a process on Linux. Thanks for reading this article.

2020年9月4日 星期五

[Linux 文章收集] How To List and Delete Iptables Firewall Rules

 Source From Here

Introduction
Iptables is a firewall that plays an essential role in network security for most Linux systems. While many iptables tutorials will teach you how to create firewall rules to secure your server, this one will focus on a different aspect of firewall management: listing and deleting rules.

In this tutorial, we will cover how to do the following iptables tasks:
* List rules
* Clear Packet and Byte Counters
* Delete rules
* Flush chains (delete all rules in a chain)
* Flush all chains and tables, delete all chains, and accept all traffic


List Rules by Specification
To list out all of the active iptables rules by specification, run the iptables command with the -S option:
$ sudo iptables -S
-P INPUT DROP
-P FORWARD DROP
-P OUTPUT ACCEPT
-N ICMP
-N TCP
-N UDP
-A INPUT -m conntrack --ctstate RELATED,ESTABLISHED -j ACCEPT
-A INPUT -i lo -j ACCEPT
-A INPUT -m conntrack --ctstate INVALID -j DROP
-A INPUT -p udp -m conntrack --ctstate NEW -j UDP
-A INPUT -p tcp -m tcp --tcp-flags FIN,SYN,RST,ACK SYN -m conntrack --ctstate NEW -j TCP
-A INPUT -p icmp -m conntrack --ctstate NEW -j ICMP
-A INPUT -p udp -j REJECT --reject-with icmp-port-unreachable
-A INPUT -p tcp -j REJECT --reject-with tcp-reset
-A INPUT -j REJECT --reject-with icmp-proto-unreachable
-A TCP -p tcp -m tcp --dport 22 -j ACCEPT

As you can see, the output looks just like the commands that were used to create them, without the preceding iptables command. This will also look similar to the iptables rules configuration files, if you’ve ever used iptables-persistent or iptables save.

List Specific Chain
If you want to limit the output to a specific chain (INPUT, OUTPUT, TCP, etc.), you can specify the chain name directly after the -S option. For example, to show all of the rule specifications in the TCP chain, you would run this command:
$ sudo iptables -S TCP
-N TCP
-A TCP -p tcp -m tcp --dport 22 -j ACCEPT

Let’s take a look at the alternative way to view the active iptables rules, as a table of rules.

List Rules as Tables
Listing the iptables rules in the table view can be useful for comparing different rules against each other. To output all of the active iptables rules in a table, run the iptables command with the -L option:
# iptables -L
Chain INPUT (policy ACCEPT)
target prot opt source destination
ACCEPT udp -- anywhere anywhere udp dpt:domain
ACCEPT tcp -- anywhere anywhere tcp dpt:domain
ACCEPT udp -- anywhere anywhere udp dpt:bootps
ACCEPT tcp -- anywhere anywhere tcp dpt:bootps

Chain FORWARD (policy ACCEPT)
target prot opt source destination
DOCKER-USER all -- anywhere anywhere
...

This will output all of current rules sorted by chain.

If you want to limit the output to a specific chain (INPUT, OUTPUT, TCP, etc.), you can specify the chain name directly after the -L option. Let’s take a look at an example INPUT chain:
# iptables -L INPUT
  1. Chain INPUT (policy ACCEPT)  
  2. target     prot opt source               destination  
  3. ACCEPT     udp  --  anywhere             anywhere             udp dpt:domain  
  4. ACCEPT     tcp  --  anywhere             anywhere             tcp dpt:domain  
  5. ACCEPT     udp  --  anywhere             anywhere             udp dpt:bootps  
  6. ACCEPT     tcp  --  anywhere             anywhere             tcp dpt:bootps  

The first line of output indicates the chain name (INPUT, in this case), followed by its default policy (DROP). The next line consists of the headers of each column in the table, and is followed by the chain’s rules. Let’s go over what each header indicates:
* target: If a packet matches the rule, the target specifies what should be done with it. For example, a packet can be accepted, dropped, logged, or sent to another chain to be compared against more rules
prot: The protocol, such as tcp, udp, icmp, or all
* opt: Rarely used, this column indicates IP options
* source: The source IP address or subnet of the traffic, or anywhere
* destination: The destination IP address or subnet of the traffic, or anywhere

The last column, which is not labeled, indicates the options of a rule. That is, any part of the rule that isn’t indicated by the previous columns. This could be anything from source and destination ports, to the connection state of the packet.

Show Packet Counts and Aggregate Size
When listing iptables rules, it is also possible to show the number of packets, and the aggregate size of the packets in bytes, that matched each particular rule. This is often useful when trying to get a rough idea of which rules are matching against packets. To do so, simply use the -L and -v option together.

For example, let’s look at the INPUT chain again, with the -v option:
# iptables -L INPUT -v
Chain INPUT (policy ACCEPT 329K packets, 763M bytes)
pkts bytes target prot opt in out source destination
0 0 ACCEPT udp -- virbr0 any anywhere anywhere udp dpt:domain
0 0 ACCEPT tcp -- virbr0 any anywhere anywhere tcp dpt:domain
0 0 ACCEPT udp -- virbr0 any anywhere anywhere udp dpt:bootps
0 0 ACCEPT tcp -- virbr0 any anywhere anywhere tcp dpt:bootps


// Drop packet from ping
# iptables -A INPUT -p icmp --icmp-type echo-request -j REJECT

# ping -c 4 192.168.58.129
PING 192.168.58.129 (192.168.58.129) 56(84) bytes of data.
From 192.168.58.129 icmp_seq=1 Destination Port Unreachable
From 192.168.58.129 icmp_seq=2 Destination Port Unreachable
From 192.168.58.129 icmp_seq=3 Destination Port Unreachable
From 192.168.58.129 icmp_seq=4 Destination Port Unreachable


# iptables -L INPUT -v
  1. Chain INPUT (policy ACCEPT 329K packets, 763M bytes)  
  2. pkts bytes target     prot opt in     out     source               destination  
  3.     0     0 ACCEPT     udp  --  virbr0 any     anywhere             anywhere             udp dpt:domain  
  4.     0     0 ACCEPT     tcp  --  virbr0 any     anywhere             anywhere             tcp dpt:domain  
  5.     0     0 ACCEPT     udp  --  virbr0 any     anywhere             anywhere             udp dpt:bootps  
  6.     0     0 ACCEPT     tcp  --  virbr0 any     anywhere             anywhere             tcp dpt:bootps  
  7.     4   336 REJECT     icmp --  any    any     anywhere             anywhere             icmp echo-request reject-with icmp-port-unreachable  

Now that you know how to list the active firewall rules in a variety of ways, let’s look at how you can reset the packet and byte counters.

Reset Packet Counts and Aggregate Size
If you want to clear, or zero, the packet and byte counters for your rules, use the -Z option. They also reset if a reboot occurs. This is useful if you want to see if your server is receiving new traffic that matches your existing rules.

To clear the counters for all chains and rules, use the -Z option by itself:
# iptables -Z

To clear the counters for all rules in a specific chain, use the -Z option and specify the chain. For example, to clear the INPUT chain counters run this command:
# iptables -Z INPUT

If you want to clear the counters for a specific rule, specify the chain name and the rule number. For example, to zero the counters for the 1st rule in the INPUT chain, run this:
# iptables -Z INPUT 1

Now that you know how to reset the iptables packet and byte counters, let’s look at the two methods that can be used to delete them.

Delete Rule by Specification
One of the ways to delete iptables rules is by rule specification. To do so, you can run the iptables command with the -D option followed by the rule specification. If you want to delete rules using this method, you can use the output of the rules list, iptables -S, for some help.

For example, if you want to delete the rule that drops invalid incoming packets (-A INPUT -m conntrack --ctstate INVALID -j DROP), you could run this command:
# iptables -D INPUT -m conntrack --ctstate INVALID -j DROP

Delete Rule by Chain and Number
The other way to delete iptables rules is by its chain and line number. To determine a rule’s line number, list the rules in the table format and add the --line-numbers option:
# iptables -L --line-numbers
  1. [secondary_output Example Output: Rules with Line Numbers]  
  2. Chain INPUT (policy DROP)  
  3. num  target     prot opt source               destination  
  4. 1    ACCEPT     all  --  anywhere             anywhere             ctstate RELATED,ESTABLISHED  
  5. 2    ACCEPT     all  --  anywhere             anywhere  
  6. 3    DROP       all  --  anywhere             anywhere             ctstate INVALID  
  7. 4    UDP        udp  --  anywhere             anywhere             ctstate NEW  
  8. 5    TCP        tcp  --  anywhere             anywhere             tcp flags:FIN,SYN,RST,ACK/SYN ctstate NEW  
  9. 6    ICMP       icmp --  anywhere             anywhere             ctstate NEW  
  10. 7    REJECT     udp  --  anywhere             anywhere             reject-with icmp-port-unreachable  
  11. 8    REJECT     tcp  --  anywhere             anywhere             reject-with tcp-reset  
  12. 9    REJECT     all  --  anywhere             anywhere             reject-with icmp-proto-unreachable  
  13. 10   ACCEPT     tcp  --  anywhere             anywhere             tcp dpt:ssh ctstate NEW,ESTABLISHED  
  14. ...  

This adds the line number to each rule row, indicated by the num header.

Once you know which rule you want to delete, note the chain and line number of the rule. Then run the iptables -D command followed by the chain and rule number. For example, if we want to delete the input rule that drops invalid packets, we can see that it’s rule 3 of the INPUT chain. So we should run this command:
# iptables -D INPUT 3

Now that you know how to delete individual firewall rules, let’s go over how you can flush chains of rules.

Flush Chains
Iptables offers a way to delete all rules in a chain, or flush a chain. This section will cover the variety of ways to do this.

Flush a Single Chain
To flush a specific chain, which will delete all of the rules in the chain, you may use the -F, or the equivalent --flush, option and the name of the chain to flush. For example, to delete all of the rules in the INPUT chain, run this command:
# iptables -F INPUT

Flush All Chains
To flush all chains, which will delete all of the firewall rules, you may use the -F, or the equivalent --flush, option by itself:
# iptables -F

Flush All Rules, Delete All Chains, and Accept All
This section will show you how to flush all of your firewall rules, tables, and chains, and allow all network traffic. First, set the default policies for each of the built-in chains to ACCEPT. The main reason to do this is to ensure that you won’t be locked out from your server via SSH:
# iptables -P INPUT ACCEPT
# iptables -P FORWARD ACCEPT
# iptables -P OUTPUT ACCEPT

Then flush the nat and mangle tables, flush all chains (-F), and delete all non-default chains (-X):
# iptables -t nat -F
# iptables -t mangle -F

// -F [chain]: Delete all rules in chain or all chains
# iptables -F

// -X [chain]: Delete a user-defined chain
# iptables -X

Your firewall will now allow all network traffic. If you list your rules now, you will will see there are none, and only the three default chains (INPUT, FORWARD, and OUTPUT) remain.

Conclusion
After going through this tutorial, you should be familiar with how to list and delete your iptables firewall rules.

Remember that any iptables changes via the iptables command are ephemeral, and need to be saved to persist through server reboots. This is covered in the Saving Rules section of the Common Firewall Rules and Commands tutorial.

[Git 常見問題] error: The following untracked working tree files would be overwritten by merge

  Source From  Here 方案1: // x -----删除忽略文件已经对 git 来说不识别的文件 // d -----删除未被添加到 git 的路径中的文件 // f -----强制运行 #   git clean -d -fx 方案2: 今天在服务器上  gi...