Source From Here
PrefaceIn your Linux lifetime, you must’ve seen some processes take up all the CPU cycles (90-99% CPU usage), making your computer nearly unresponsive till it finishes. That may be alright if the process takes a few seconds to complete. But what If it takes a long time? That’s not very nice to sit and look at your unresponsive computer for minutes and hours, right? Well, Linux has many awesome tools to make these not very nice processes to nice processes.
You can set how much CPU a single process is allowed to have. If the process really needs a lot of CPU power, you can run a few commands to give it all the idle CPU cycles (CPU cycles that you don’t need). That way, you will never have to sit and stare at your unresponsive computer for long.
In this article, I will show you how to Limit CPU usage of a process on Linux. I am going to use CentOS 7 in this article. But any modern Linux distribution should work. So, Let’s get started.
Limiting CPU Usage with nice and renice:
On Linux, the priorities of each running processes can be changed. You can set higher priorities to the process which is more important to you than a process that is hogging your CPU for no good reason.
Every process on Linux has a nice value. The value of nice determines which process has higher priorities and which has lower. Nice value can be between -20 to 19. A process with the nice value of -20 will have the highest priority and will use the most CPU cycles. A process with the nice value 19 will have the lowest priority and will use the CPU when no other processes are using it only.
There are two ways to set the nice value of a process. You can either start a process with the nice command to set a nice value while starting the process. Or you can use the renice command to set a nice value after a process has started. To set a nice value when you start a process, run the process as follows:
NOTE: Here NICE_VALUE can be anything from -20 to 19 and COMMAND_TO_RUN is any command that you want to run with the nice value of NICE_VALUE.
For example, let’s say, you want to run the sleep command with the nice value of 14. Run the command as follows:
Now you can verify whether the nice value is set correctly using the top command. You can list all the processes that you started (as your login user) with the following command:
As you can see, the nice value of the process is set to 14.
Now if you wish to change the nice value of your existing processes, then all you need is the process ID (PID) of the process of which you want to change the nice value. You can use the ps aux command or the top command to find the process ID or PID.
Then you can run renice command as follows to change the nice value of an existing process:
Limiting CPU Usage with CGROUPS:
The full form of CGROUPS is Control Groups. It is a Linux kernel features used to limit resources to process groups such as (CPU, memory, permissions and many more) on Linux.
All you have to do is, create a new process group and add your processes that you want to limit resources to, to that group. Simple!
CGROUPS management tools are not installed on CentOS 7 by default. But it is available in the official package repository of CentOS 7. First update the YUM package repository cache with the following command:
Now install CGROUPS management tools with the following command:
You can limit CPU usage of a single group. For example, you can use CGROUPS to tell a process within a CGROUP to use let’s say 100ms out of every 1000ms (or .1s out of every 1s) of CPU time.
First create a CGROUP with the following command:
NOTE: Here, cpulimit is the group name that controls the cpu usage.
Now, you have to set cpu.cfs_period_us and cpu.cfs_quota_us property on the cpulimit group.
For this example, 1000ms (milliseconds) or 1000000us (microseconds) should be set to cpu.cfs_period_us property and 100ms or 100000us should be set to the cpu.cfs_quota_us property. Run the following commands to set these properties to the cpulimit group:
Now you can run the following command to check whether all the properties are correctly set:
NOTE: Here, cpulimit is the name of the CGROUP and cpu is the resource that I am limiting.
As you can see, cpu.cfs_period_us and cpu.cfs_quota_us are correctly set:
- # cgget -g cpu:cpulimit
- cpulimit:
- cpu.cfs_period_us: 1000000
- cpu.stat: nr_periods 2
- nr_throttled 0
- throttled_time 0
- cpu.shares: 1024
- cpu.cfs_quota_us: 100000
- cpu.rt_runtime_us: 0
- cpu.rt_period_us: 1000000
Now to limit CPU of a process, start the program or command with cgexec as follows:
NOTE: Here, YOUR_COMMAND can be any valid Linux commands.
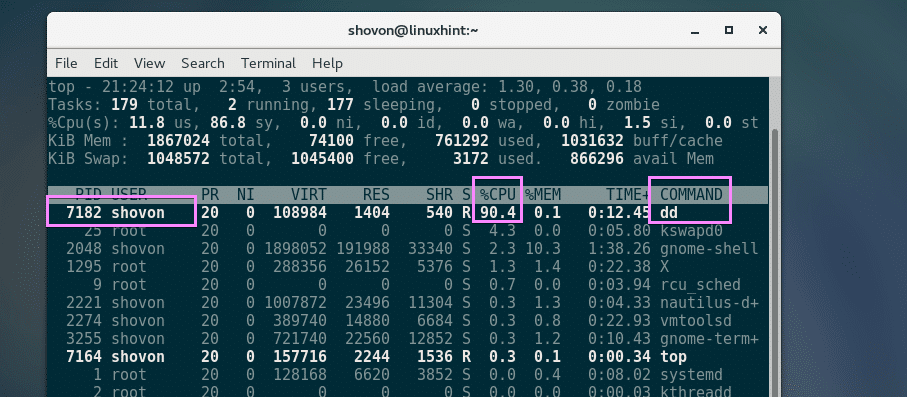
To prove that it actually works, first I am going to run the following command without CGROUPS and then with CGROUPS and show you the results:
As you can see, without CGROUPS, the command uses 90% of the total CPU:

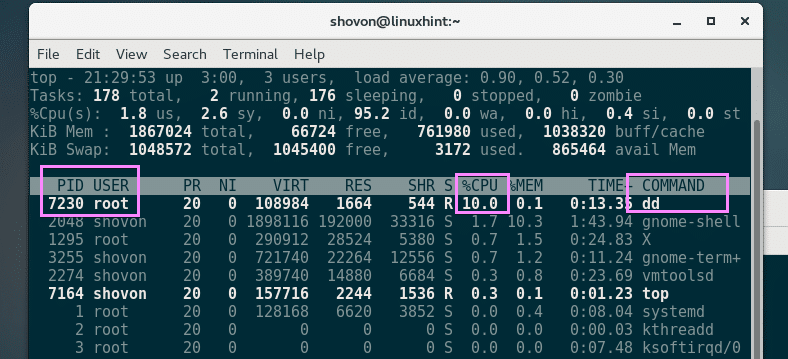
Then, I ran the same command with CGROUPS as follows:
As you can see, the CPU usage is 10% at maximum. The process is not using more than that:

So that’s how you use CGROUPS to limit CPU usage of a process on Linux. Thanks for reading this article.

沒有留言:
張貼留言