Source From Here
Preface
Learn how to publish your own python packages
In this article, let us understand how to develop a python package and then publish it to PyPi for distribution. This is a technical article with some advanced concepts but I will take some time to introduce each of the concepts in detail and provide a walkthrough performing all the steps as we proceed. It is very often for programmers in python to use various packages like Pandas, NumPy, etc. within your python application to make it more robust and leverage the rich functionalities of the SDKs. In order to use any such packages within your code, you first need to get these packages installed on your machine and then import it into your code.
The idea might seem familiar when we talk about PIP — the famous package management tool in python. In order to install any packages in python, we use pip install <package_name> and the package gets installed on our machine. However, these packages are maintained in a central repository known as PyPi or Python Package Index. PyPi is the official third-party software repository for python packages. Whenever you run the pip install command, the pip tool searches the package in this repository and then downloads and installs it to your machine or virtual environment.
What is a Python Package
The very first thing when it comes to developing packages in python, is that you should know what a package and module in python is. Any code that you write in a .py file is known as a module in python. Modules can be imported into another modules. A collection of more than one modules that target any specific actions can be grouped together to form a package. A package can also contain code organized into directories and subdirectories. You can read more about python modules and packages from the official documentation.
The steps to publish a python package are quite simple as follows.
Let us now perform each of the above-mentioned steps one by one to publish our package to the PyPi repository.
Create the python package and the directory structure and other files.
You should first decide the name of your package and then create the directory name with the name of the package. Let us assume we are going to publish a package with the name “ml_data_gen”, so the directory should be of the same name. Place a data_gen.py file under it.
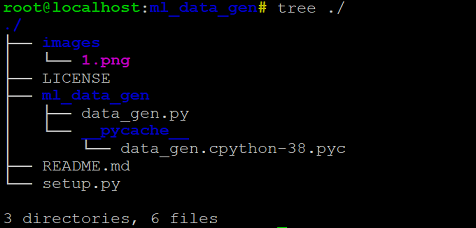
Additionally, you should also include a setup.py file, a README.md and a LICENSE file under the root directory for your project. You can read more about licensing from the GitHub link. At this time, your project structure should look something as below:
Now, let us start editing the setup.py file. You can use the following snippet to update your setup file:
Once the setup file is ready, the final step is to update the README.md file. It is just markdown file that you can use to document your package when it is deployed or also on GitHub for your project.
Generate the distribution archives on local machine.
Now that the code for the python package is almost complete, you can start building the distribution archives. Archives are compressed files that help your package to be deployed across multiple platforms and also make it platform independent. In order to generate the distribution archives, run the following command from your terminal:
This will upgrade your setuptools library on your machine to use the latest version. After this, you need to run the following command from the root directory of your package to generate the distribution files.
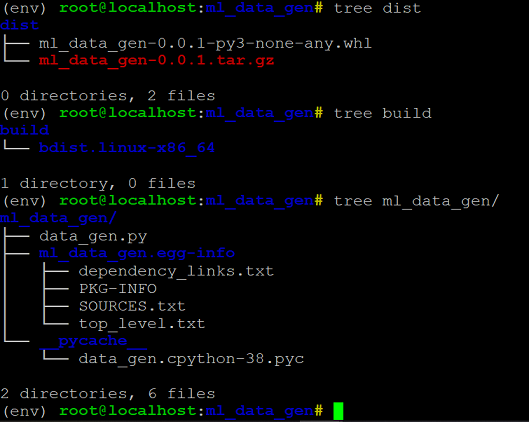
Once you run the above command, you can see that the distribution packages will be delivered under the directories — build and dist, that are newly created as below. In addition to that, you can also see that the egg file information has been updated in the project source code as well.
Install the package on local machine.
Now that we have our distribution files ready, we can go ahead and try installing and importing the package to test if it works fine. In order to install the package on your local machine, run the following command from the root directory:
Next, let's see how to use installed package:
Publish the package to the TestPyPi
Once the package is installed on local and works fine, it is now ready to be shipped to the TestPyPi repository. This is a test repository for all python packages to test and see if all code works fine and there are no issues within the package code. This keeps it isolated from the official PyPi repository and makes sure that only thorough tested packages are deployed to production.
Navigate to https://test.pypi.org/ and register yourself as a user:
Once you are registered, open your terminal and run the following command. This will install a package called “twine” on your machine that will help ship the python package to the repositories:
You can read the official documentation about packaging python applications and also about twine here. After the twine package is installed, you have to configure some credentials for login PyPi/TestPyPi:
and then run the following command to ship the code to TestPyPi first. When you run the command, you will be asked to provide the same credentials using which you have registered your account in the previous step:
Back to your TestPyPi Page:
As you can see in the figure above, the python package has now been shipped to the TestPyPi repository. In order to install the package from the test repository, first we will uninstall the already existing package and then run the following command to install it:
This will install the package on the local system from the TestPyPi repository.
Publish the package to the PyPi repository
Now that everything works well with our package, it’s time that we publish it to the official PyPi repository. Follow the same steps to register an account and then run the following command to ship the package to the official repository:
Learn how to publish your own python packages
In this article, let us understand how to develop a python package and then publish it to PyPi for distribution. This is a technical article with some advanced concepts but I will take some time to introduce each of the concepts in detail and provide a walkthrough performing all the steps as we proceed. It is very often for programmers in python to use various packages like Pandas, NumPy, etc. within your python application to make it more robust and leverage the rich functionalities of the SDKs. In order to use any such packages within your code, you first need to get these packages installed on your machine and then import it into your code.
The idea might seem familiar when we talk about PIP — the famous package management tool in python. In order to install any packages in python, we use pip install <package_name> and the package gets installed on our machine. However, these packages are maintained in a central repository known as PyPi or Python Package Index. PyPi is the official third-party software repository for python packages. Whenever you run the pip install command, the pip tool searches the package in this repository and then downloads and installs it to your machine or virtual environment.
What is a Python Package
The very first thing when it comes to developing packages in python, is that you should know what a package and module in python is. Any code that you write in a .py file is known as a module in python. Modules can be imported into another modules. A collection of more than one modules that target any specific actions can be grouped together to form a package. A package can also contain code organized into directories and subdirectories. You can read more about python modules and packages from the official documentation.
The steps to publish a python package are quite simple as follows.
Let us now perform each of the above-mentioned steps one by one to publish our package to the PyPi repository.
Create the python package and the directory structure and other files.
You should first decide the name of your package and then create the directory name with the name of the package. Let us assume we are going to publish a package with the name “ml_data_gen”, so the directory should be of the same name. Place a data_gen.py file under it.
Additionally, you should also include a setup.py file, a README.md and a LICENSE file under the root directory for your project. You can read more about licensing from the GitHub link. At this time, your project structure should look something as below:

Now, let us start editing the setup.py file. You can use the following snippet to update your setup file:
- import setuptools
- with open("README.md", "r") as fh:
- long_description = fh.read()
- setuptools.setup(
- name="ml_data_gen", # This is the name of the package
- version="0.0.1", # The initial release version
- author="John Lee", # Full name of the author
- description="ml_data_gen Package for generating testing data",
- long_description=long_description, # Long description read from the the readme file
- long_description_content_type="text/markdown",
- packages=setuptools.find_packages(), # List of all python modules to be installed
- classifiers=[
- "Programming Language :: Python :: 3",
- "License :: OSI Approved :: MIT License",
- "Operating System :: OS Independent",
- ], # Information to filter the project on PyPi website
- python_requires='>=3.6', # Minimum version requirement of the package
- py_modules=["ml_data_gen"], # Name of the python package
- package_dir={'':'ml_data_gen/src'}, # Directory of the source code of the package
- install_requires=[] # Install other dependencies if any
- )
- ## <font color='darkblue'>Introduction</font>
- This repo is used to generate testing data used in ML for quick evaluation.
Now that the code for the python package is almost complete, you can start building the distribution archives. Archives are compressed files that help your package to be deployed across multiple platforms and also make it platform independent. In order to generate the distribution archives, run the following command from your terminal:
This will upgrade your setuptools library on your machine to use the latest version. After this, you need to run the following command from the root directory of your package to generate the distribution files.
Once you run the above command, you can see that the distribution packages will be delivered under the directories — build and dist, that are newly created as below. In addition to that, you can also see that the egg file information has been updated in the project source code as well.

Install the package on local machine.
Now that we have our distribution files ready, we can go ahead and try installing and importing the package to test if it works fine. In order to install the package on your local machine, run the following command from the root directory:
Next, let's see how to use installed package:
Publish the package to the TestPyPi
Once the package is installed on local and works fine, it is now ready to be shipped to the TestPyPi repository. This is a test repository for all python packages to test and see if all code works fine and there are no issues within the package code. This keeps it isolated from the official PyPi repository and makes sure that only thorough tested packages are deployed to production.
Navigate to https://test.pypi.org/ and register yourself as a user:

Once you are registered, open your terminal and run the following command. This will install a package called “twine” on your machine that will help ship the python package to the repositories:
You can read the official documentation about packaging python applications and also about twine here. After the twine package is installed, you have to configure some credentials for login PyPi/TestPyPi:
and then run the following command to ship the code to TestPyPi first. When you run the command, you will be asked to provide the same credentials using which you have registered your account in the previous step:
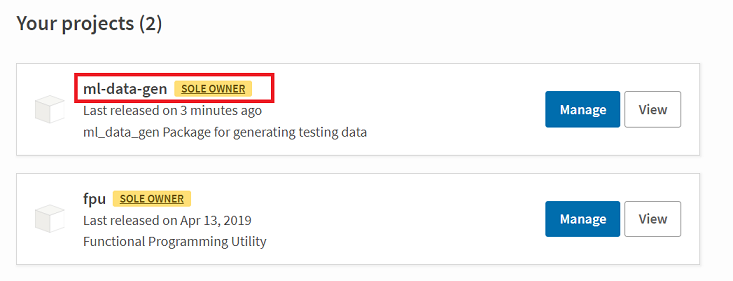
Back to your TestPyPi Page:

As you can see in the figure above, the python package has now been shipped to the TestPyPi repository. In order to install the package from the test repository, first we will uninstall the already existing package and then run the following command to install it:
This will install the package on the local system from the TestPyPi repository.
Publish the package to the PyPi repository
Now that everything works well with our package, it’s time that we publish it to the official PyPi repository. Follow the same steps to register an account and then run the following command to ship the package to the official repository:

Congratulation! You have completed it and create your first Python package!


