2019年5月24日 星期五

[Git 文章收集] Use Personal Access Token with Git


Source From Here
Preface
This post is to introduce an easy way to use personal access token with git (GitHub, GitLab, Bitbucket or whatever), such that you don’t have to enter your username and password when you push any commit. The only usage of personal access token in this post is to authorize git operations, like git push. Other usages are not discussed. I’m going to use osti@gitlab as an example. Other websites should be similar.

Generating a personal access token
Go to "Your Profile" > "Developer Settings" > "Personal access tokens" and Click on "Generate new token" to produce your personal token:


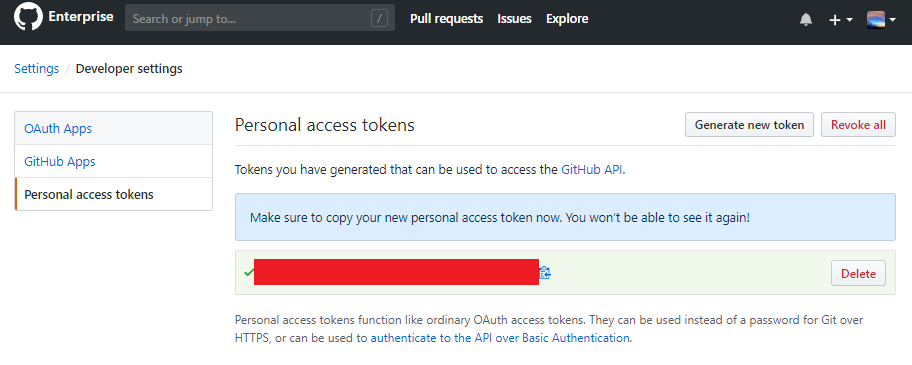
Save the new token for later authorization.

Using your token
Below is one example in using generated token above to do the authorization:
cxzhu:~/Documents/gits/test_at_osti$ git push origin master
  1. Username for 'https://gitlab.osti.gov': czhu  
  2. Password for 'https://czhu@gitlab.osti.gov': yLVVsT8PbM-zxhrFRryM  
  3. warning: redirecting to https://gitlab.osti.gov/czhu/test_at_osti.git/  
  4. Counting objects: 3, done.  
  5. Writing objects: 100% (3/3), 236 bytes | 236.00 KiB/s, done.  
  6. Total 3 (delta 0), reused 0 (delta 0)  
  7. To http://gitlab.osti.gov/czhu/test_at_osti.git  
  8. * [new branch]      master -> master  
But it is not a good idea to type the token everytime, especially it is a nonsense combination of characters.

Saving your token
The clever way is to save your personal access token by using curl, or other tools like git credentials. Here I’m going to introduce the easiest way using curl. I got the idea from here.
1. Save your token with curl
# curl -H 'Authorization: token yLVVsT8PbM-zxhrFRryM' https://czhu@gitlab.osti.gov


2. Add/replace your repository with authorizations You can clone a repository with authorization, like

Using ssh keys
When I use GitHub, I prefer to use ssh keys. You can find a detailed instruction on GitHub Help. It’s the most convenient and safest way. There are only two tips I would like to share.

1. Using ssh keys on MAC
To successfully add the key to ssh-agent, you can follow this page . But I found there is one additional step, at least on my macbook. That is you have to manually add github.com in known_hosts file, by typing:
# ssh-keyscan github.com >> ~/.ssh/known_hosts


2. Using ssh keys on Linux
On the GitHub Help Linux page, all the commands are suitable for bash shell. But if you are using other shells, like I use TC-shell on PPPL cluster, you have to replace the last two commands with the following ones.
# ssh-agent /bin/sh
# ssh-add ~/.ssh/id_rsa


Supplement
FAQ - Where to store the personal access token from GitHub?
// Git Tools - Credential Storage
# git config --global credential.helper 'store --file ~/.my-credentials'


2019年5月22日 星期三

[ Python 文章收集 ] python 任務調度之 schedule

Source From Here 
Preface 
在工作中多少都會涉及到一些定時任務,比如定時郵件提醒等.本文通過開源項目 schedule 來學習定時任務調度是如何工作的,以及基於此實現一個 web 版本的提醒工具. 

schedule 簡介 
既然 schedule 說是給人類使用的作業調度器, 先來看看作者給提供的例子: 
  1. import schedule  
  2. import time  
  3.   
  4. def job():  
  5.     print("I'm working...")  
  6.   
  7. schedule.every(10).minutes.do(job)  
  8. schedule.every().hour.do(job)  
  9. schedule.every().day.at("10:30").do(job)  
  10. schedule.every().monday.do(job)  
  11. schedule.every().wednesday.at("13:15").do(job)  
  12.   
  13. while True:  
  14.     schedule.run_pending()  
  15.     time.sleep(1)  

上面的意思就是: 
每隔10分鐘執行一次任務
每隔一小時執行一次任務
每天10:30執行一次任務
每週一的這個時候執行一次任務
每週三13:15執行一次任務

schedule 源碼學習 
首先看一下有哪些類, 如圖 ( 使用 pycharm 導出的 ): 
 

可以看到只有三個類,源碼分析就圍繞這三個類: 

Class CancelJob 
  1. class CancelJob(object):  
  2.     pass  
可以看到就是一個空類, 這個類的作用就是當你的 job 執行函數返回一個 CancelJob 類型的對象,那麼執行完後就會被 Scheduler 移除. 簡單說就是只會執行一次. 

Class Scheduler 
為了使代碼緊湊,這裡刪除了註釋,剩下也就 34 行代碼: 
  1. class Scheduler(object):  
  2.     """  
  3.     Objects instantiated by the :class:`Scheduler ` are  
  4.     factories to create jobs, keep record of scheduled jobs and  
  5.     handle their execution.  
  6.     """  
  7.     def __init__(self):  
  8.         self.jobs = []  
  9.   
  10.     def run_pending(self):  
  11.         runnable_jobs = (job for job in self.jobs if job.should_run)  
  12.         for job in sorted(runnable_jobs):  
  13.             self._run_job(job)  
  14.   
  15.     def run_all(self, delay_seconds=0):  
  16.         logger.info('Running *all* %i jobs with %is delay inbetween',  
  17.                     len(self.jobs), delay_seconds)  
  18.         for job in self.jobs[:]:  
  19.             self._run_job(job)  
  20.             time.sleep(delay_seconds)  
  21.   
  22.     def clear(self, tag=None):  
  23.         if tag is None:  
  24.             del self.jobs[:]  
  25.         else:  
  26.             self.jobs[:] = (job for job in self.jobs if tag not in job.tags)  
  27.   
  28.     def cancel_job(self, job):  
  29.         try:  
  30.             self.jobs.remove(job)  
  31.         except ValueError:  
  32.             pass  
  33.   
  34.     def every(self, interval=1):  
  35.         job = Job(interval, self)  
  36.         return job  
  37.   
  38.     def _run_job(self, job):  
  39.         ret = job.run()  
  40.         if isinstance(ret, CancelJob) or ret is CancelJob:  
  41.             self.cancel_job(job)  
  42.   
  43.     @property  
  44.     def next_run(self):  
  45.         if not self.jobs:  
  46.             return None  
  47.         return min(self.jobs).next_run  
  48.   
  49.     @property  
  50.     def idle_seconds(self):  
  51.         return (self.next_run - datetime.datetime.now()).total_seconds()  
Scheduler 作用就是在 job 可以執行的時候執行它. 這裡的函數也都比較簡單: 
* run_pending: 運行所有可以運行的任務
* run_all: 運行所有任務,不管是否應該運行
* clear: 刪除所有調度的任務
* cancel_job: 刪除一個任務
* every: 創建一個調度任務, 返回的是一個 Job 物件
* _run_job: 運行一個 Job 物件
* next_run: 獲取下一個要運行任務的時間, 這裡使用的是 min 去得到最近將執行的 job, 之所以這樣使用,是 Job 重載了__lt__ 方法,這樣寫起來確實很簡潔.
* idle_seconds: 還有多少秒即將開始運行任務.

Class Job 
Job 是整個定時任務的核心. 主要功能就是根據創建 Job 時的參數, 得到下一次運行的時間. 代碼如下,稍微有點長 (會省略部分代碼,可以看 源碼). 這個類別提供的ˊ方法也不是很多, 有很多邏輯是一樣的. 簡單介紹一下建構子的參數: 
* interval: 間隔多久,每 interval 秒或分等.
* job_func: job 執行函數
* unit : 間隔單元,比如 minutes, hours
* at_time: job 具體執行時間點,比如 10:30等
* last_run: job上一次執行時間
* next_run: job下一次即將運行時間
* period: 距離下次運行間隔時間
* start_day: 週的特殊天,也就是 monday 等的含義

再來看一下幾個重要的方法: 
__lt__
被使用在比較哪個 job 最先即將執行, Scheduler 中 next_run 方法裡使用 min 會用到, 有時合適的使用 python 這些特殊方法可以簡化代碼,看起來更 pythonic.

second、seconds: 
second、seconds 的區別就是 second 時默認 interval ==1, 即 schedule.every().second 和 schedule.every(1).seconds 是等價的,作用就是設置 unit 為 seconds. minute 和 minutes、hour 和hours 、day 和 days、week 和 weeks 也類似.

monday: 
設置 start_day 為 monday, unit 為 weeks, interval 為1 . 含義就是每週一執行 job. 類似 tuesday、wednesday、thursday、friday、saturday、sunday 一樣.

at
表示 某天的某個時間點,所以不適合 minutes、weeks 且 start_day 為空 (即單純的周) 這些 unit. 對於 unit 為 hours 時, time_str 中小時部分為 0.

do
設置 job 對應的函數以及參數, 這裡使用 functools.update_wrapper 去更新函數名等信息.主要是 functools.partial 返回的函數和原函數名稱不一樣.具體可以看​​看官網文檔. 然後調用 _schedule_next_run 去計算 job 下一次執行時間.

should_run: 
判斷 job 是否可以運行了.依據是當前時間點大於等於 job 的 next_run

_schedule_next_run
這是整個 job 的定時的邏輯部分是計算 job 下次運行的時間點的. 這邊描述一下流程, 首先是計算下一次執行時間:
  1. self.period = datetime.timedelta(**{self.unit: interval})  
  2. self.next_run = datetime.datetime.now() + self.period  
這裡根據 unit 和 interval 計算出下一次運行時間. 舉個例子,比如 schedule.every().hour.do(job, message='things') 下一次運行時間就是當前時間加上一小時的間隔. 但是當 start_day 不為空時,即表示某個星期. 這時 period 就不能直接加在當前時間了. 看代碼:
  1. weekday = weekdays.index(self.start_day)  
  2. days_ahead = weekday - self.next_run.weekday()  
  3. if days_ahead <= 0:  # Target day already happened this week  
  4.     days_ahead += 7  
  5. self.next_run += datetime.timedelta(days_ahead) - self.period  
其中 days_ahead 表示 job 表示的星期幾與當表示的星期幾差幾天. 比如今天是 星期三,job 表示的是 星期五,那麼 days_ahead 就為2,最終 self.next_run 效果就是在 now 基礎上加了2天.

接著當 at_time 不為空時, 需要更新執行的時間點,具體就是計算時、分、秒然後調用 replace 進行更新.

Real User Cases 
這邊介紹實際使用範例. 

在 N 小時/分鐘 後執行並只一次 
這個範例很像 Linux 命令 at 的功能, 簡單來說就是延遲一段時間後再執行某個 job. 這邊我們會繼承 Job 並客製成我們需要的功能 MyJob 類別: 
test_run_after.py 
  1. #!/usr/bin/env python3  
  2. import schedule  
  3. import logging  
  4. import functools  
  5. import os  
  6. import re  
  7. import time  
  8. from schedule import Job, CancelJob, IntervalError  
  9. from datetime import datetime, timedelta  
  10.   
  11. logging.basicConfig(level=logging.INFO)  
  12. logger = logging.getLogger(os.path.basename(__file__))  
  13. logger.setLevel(20)  
  14.   
  15. class MyJob(Job):  
  16.     def __init__(self, scheduler=None):  
  17.         super(MyJob, self).__init__(1, scheduler)  
  18.         self.regex = re.compile(r'((?P\d+?)hr)?((?P\d+?)m)?((?P\d+?)s)?')  
  19.   
  20.     def parse_time(self, time_str):  
  21.         # https://stackoverflow.com/questions/4628122/how-to-construct-a-timedelta-object-from-a-simple-string  
  22.         parts = self.regex.match(time_str)  
  23.         if not parts:  
  24.             raise IntervalError()  
  25.   
  26.         parts = parts.groupdict()  
  27.         time_params = {}  
  28.         for (name, param) in parts.items():  
  29.             if param:  
  30.                 time_params[name] = int(param)  
  31.   
  32.         return timedelta(**time_params)  
  33.   
  34.     def do(self, job_func, *args, **kwargs):  
  35.         self.job_func = functools.partial(job_func, *args, **kwargs)  
  36.         try:  
  37.             functools.update_wrapper(self.job_func, job_func)  
  38.         except AttributeError:  
  39.             # job_funcs already wrapped by functools.partial won't have  
  40.             # __name__, __module__ or __doc__ and the update_wrapper()  
  41.             # call will fail.  
  42.             pass  
  43.   
  44.         self.scheduler.jobs.append(self)  
  45.         return self  
  46.   
  47.     def after(self, atime):  
  48.         if isinstance(atime, timedelta):  
  49.             self.next_run = datetime.now() + atime  
  50.         elif isinstance(atime, str):  
  51.             times = atime.split(':')  
  52.             if len(times) == 3:  # HH:MM:SS  
  53.                 self.next_run = datetime.now() + timedelta(hours=int(times[0]), minutes=int(times[1]), seconds=int(times[2]))  
  54.             else:  
  55.                 self.next_run = datetime.now() + self.parse_time(atime)  
  56.         else:  
  57.             raise IntervalError()  
  58.   
  59.         return self  
  60.   
  61.     def run(self):  
  62.         logger.info('Running job %s', self)  
  63.         ret = self.job_func()  
  64.         self.last_run = datetime.now()  
  65.         return CancelJob()  
  66.   
  67. def main():  
  68.     def work():  
  69.         logger.info('Work done at {}'.format(datetime.now()))  
  70.   
  71.     myjob = MyJob(schedule.default_scheduler)  
  72.     myjob.after('2m').do(work)  # Do work after 2 minutes  
  73.   
  74.     logger.info('Now is {}'.format(datetime.now()))  
  75.     while len(schedule.default_scheduler.jobs) > 0:  
  76.         schedule.run_pending()  
  77.         time.sleep(1)  
  78.   
  79.     logger.info('All job done!')  
  80.   
  81.   
  82. if __name__ == '__main__':  
  83.     main()  
Execution result: 
# ./test_run_after.py
INFO:test_run_after.py:Now is 2019-05-23 13:57:06.289055
INFO:test_run_after.py:Running job functools.partial(.work at 0x7f7d85a43950>)
INFO:test_run_after.py:Work done at 2019-05-23 13:59:06.438432
INFO:test_run_after.py:All job done!


Supplement 
鳥哥私房菜 - 第十五章、例行性工作排程(crontab)

[Git 常見問題] error: The following untracked working tree files would be overwritten by merge

  Source From  Here 方案1: // x -----删除忽略文件已经对 git 来说不识别的文件 // d -----删除未被添加到 git 的路径中的文件 // f -----强制运行 #   git clean -d -fx 方案2: 今天在服务器上  gi...